자 오늘은 저번에 깜박한 회원가입 성공 후, 이메일 인증을 구현해봤습니다!
우선 저는 중복되는게 보여서 Form에 사용되는 styles 코드를 따로 빼서 아래처럼 파일로 옮겨서 사용했습니다.
import { StyleSheet } from "react-native";
import { BASE_COLOR } from "../constants/color";

export const formStyle = StyleSheet.create({
  form: {
    flex: 3,
    justifyContent: "flex-start",
  },
  submitButton: {
    backgroundColor: BASE_COLOR.LIGHT,
    padding: 20,
    borderRadius: 15,
    alignItems: "center",
    marginHorizontal: 20,
    marginTop: 30,
  },
  submitButtonText: {
    fontSize: 20,
    color: BASE_COLOR.LIGHT_TEXT,
  },
  signLinkText: {
    color: BASE_COLOR.LIGHT,
    fontSize: 20,
    textAlign: "center",
    padding: 20,
  },
});

export const ContainerStyle = StyleSheet.create({
  base: {
    flex: 1,
    backgroundColor: BASE_COLOR.DEEP,
  },
});
자 이제 코드를 작성해봅시다.
저는 처음엔 이렇게 작성했어요.
<View style={formStyle.form}>
      <View style={styles.otpContainer}>
        {Array(6)
          .fill(0)
          .map((_, index) => (
            <TextInput
              key={"code " + index}
              onChangeText={(value) => handleChangeText(value, index)}
              style={styles.otpInput}
              maxLength={1}
              keyboardType="number-pad"
              returnKeyType={index === 5 ? "done" : "next"}
            />
          ))}
      </View>
      <Pressable style={formStyle.submitButton} onPress={submit}>
        <Text style={formStyle.submitButtonText}>인증하기</Text>
      </Pressable>

      <Pressable style={formStyle.signLinkText} onPress={resendCode}>
        <Text style={formStyle.signLinkText}>인증코드 다시보내기</Text>
      </Pressable>
    </View>
전에 프로그래머스에서 Array().fill().map 이런식으로 사용하는 사람이 있기에 그걸 활용해 봤습니다.
설명하자면, 아래와 같습니다.
- 6개의 배열의 0으로 채우고, map을 돌립니다.
- 즉 6개의 TextInput을 만듭니다.
- map에는 key값이 필수 이기에 저렇게 설정했습니다.
- maxLength는 최대 글자 수입니다.
- 저희 코드는 숫자로 전송되기 때문에 number-pad로 설정했습니다.
- returnKeyType 은 마지막만 제외하고 next로 설정했습니다.
자 이제 작성해보면 뭔가 이상합니다.
보통 OTP 생각하면 채워지면 다음 Input으로 넘어가는데 이건 안넘어가죠 이럴 땐 Ref를 사용해봅시다.
우선 이렇게 Ref를 설정했습니다.
const inputs = useRef<TextInput[]>([]);
그리고 TextInput 프롭으로 아래를 추가해줍니다.
onSubmitEditing={() => {
                if (index < 5) inputs.current[index + 1].focus();
              }}
ref={(ref) => (inputs.current[index] = ref!)}
ref로 각각을 설정하고
만약 다음 버튼이 눌렸을 때 포커스를 다음 인풋으로 옮기게 했습니다.
handleChangeText는 아래와 같이 작성했습니다.
 const handleChangeText = (value: string, index: number) => {
    const updateCode = [...code];
    updateCode[index] = value;
    setCode(updateCode.join(""));

    if (value && index < 5) {
      inputs.current[index + 1].focus();
    }
  };
code는 state로 string 타입입니다.
- Spread문법으로 배열을 만듭니다. 처음엔 빈배열일겁니다.
- 차례대로 하면 순서대로 들어갈 것입니다.
- if문은 입력이 되면 마지막 input이아니라면 다음 input으로 포커스를 바꾸는 방식입니다.
여기서 문제가 생겼네요.
순서대로 진행하면 잘 되는데 유저가 시작을 이상한 곳에서 하면 이상해지는 문제가 발생하는 군요.
수정해봅시다.
이상한 곳에서 시작하면 앞에 부분은 undefined가 들어가니 우선 배열로 만들고 배열을 채워봅시다.
const [code, setCode] = useState<string[]>(Array(6).fill(""));
다음은 나머지를 수정해봅시다.
const handleChangeText = (value: string, index: number) => {
    const updateCode = [...code];

    updateCode[index] = value;
    console.log(updateCode);
    setCode(updateCode);

    if (value && index < 5) {
      inputs.current[index + 1].focus();
    }
  };
좋아요 이제 submit 인증하기를 구현해봅시다.
 const submit = async () => {
    if (loading) {
      return;
    }

    if (code.includes("")) {
      inputs.current[0].focus();
      return;
    }

    try {
      setLoading(true);

      const res = await axiosInstance.post("auth/confirm-email", {
        email,
        code: code.join(""),
      });
      if (res.status === 204) {
        alert("이메일 인증이 완료되었습니다.");
        router.replace("/login");
      }
    } catch (e) {
      const message = changeAxiosErrorMessage(e);
      alert(message);
    } finally {
      setLoading(false);
    }
  };
로딩 중이거나, 빈문자열이 있으면 리턴하게 시켰습니다.
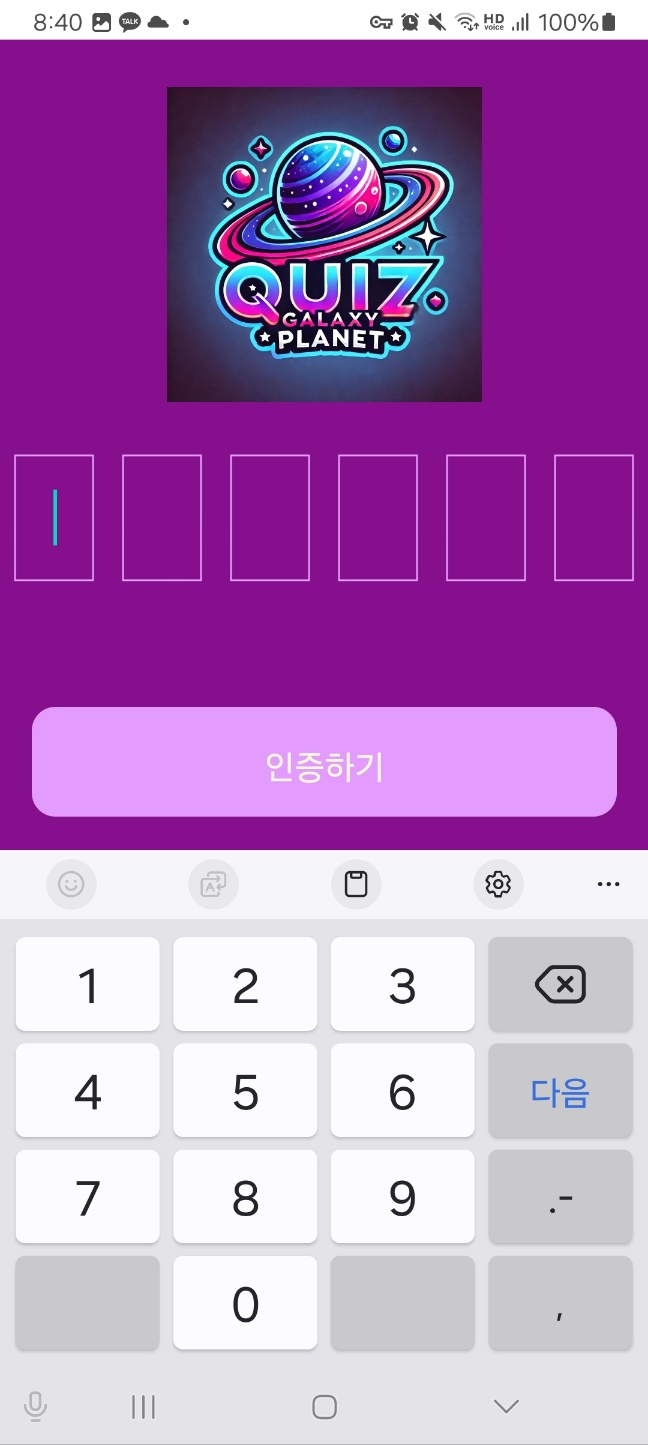
자 완성된 디자인을 볼까요?

전체 코드는 아래 링크에서 보실 수 있습니다.
SiWooJinSeok/QuizGalaxyPlanet: QuizGalaxyPlanet App (github.com)
GitHub - SiWooJinSeok/QuizGalaxyPlanet: QuizGalaxyPlanet App
QuizGalaxyPlanet App. Contribute to SiWooJinSeok/QuizGalaxyPlanet development by creating an account on GitHub.
github.com
오늘은 여기까지 하겠습니다~
다들 오늘도 수고하셨습니다.
그럼 전 이만~~
'퀴즈앱 개발기 > RN' 카테고리의 다른 글
| 퀴즈앱 8일차 (+ 머리가 안돌아가는 날..) (0) | 2024.06.28 |
|---|---|
| 퀴즈앱(7일차) 회원가입, 로그인(+로컬 백엔드 사용하기) (0) | 2024.06.27 |
| 퀴즈앱 6일차 (0) | 2024.06.26 |
| 퀴즈앱 5일차(Expo router 사용법) (0) | 2024.06.25 |