안녕하세요 뉴비개발자입니다.
오늘은 스웨거를 만들어 볼까 합니다.
보통 이런 건 nest 공식문서에 많이 있습니다.
검색해도 나오지만 아래 링크를 둘게요!
OpenAPI (Swagger) | NestJS - A progressive Node.js framework
Documentation | NestJS - A progressive Node.js framework
Nest is a framework for building efficient, scalable Node.js server-side applications. It uses progressive JavaScript, is built with TypeScript and combines elements of OOP (Object Oriented Programming), FP (Functional Programming), and FRP (Functional Rea
docs.nestjs.com
우선 링크에 따라 작성해봅시다.
npm install --save @nestjs/swagger
설치가 끝이 나면
main.ts에 똑같이 복붙해 줍니다. 하지만 저희가 기존에 했던 걸 반영해야겠죠?
아래처럼 반영하겠습니다.
import { NestFactory } from '@nestjs/core';
import { ValidationPipe } from '@nestjs/common';
import { SwaggerModule, DocumentBuilder } from '@nestjs/swagger';
import { AppModule } from './app.module';

async function bootstrap() {
  const app = await NestFactory.create(AppModule);

  app.useGlobalPipes(
    new ValidationPipe({
      whitelist: true, // DTO에서 데코레이터가 없는 속성을 제거
      forbidNonWhitelisted: true, // 화이트리스트에 없는 속성이 포함된 경우 요청을 거부
      transform: true, // 요청에서 넘어온 데이터를 DTO의 타입으로 변환}
    }),
  );

  const config = new DocumentBuilder()
    .setTitle('Cats example')
    .setDescription('The cats API description')
    .setVersion('1.0')
    .addTag('cats')
    .build();

  const document = SwaggerModule.createDocument(app, config);
  SwaggerModule.setup('api', app, document);
  await app.listen(3000);
}
bootstrap();
자 스웨거를 만들었습니다! 만들었으니 확인해 봐야겠죠?!
우선 실행해봅시다.
npm run start
포트 3000으로 설정했으니 localhost:3000으로 이동해봅시다.
그러면 app 파일들을 지우지 않았다면 아래처럼 보일 겁니다.

하지만 저희가 원하는 건 스웨거죠! 코드로 돌아가서 확인해봅시다.
아래 이 코드가 보이시죠?
SwaggerModule.setup('api', app, document);
여기서 'api' 부분이 나머지 엔드 포인트입니다.
저 부분을 수정하면 스웨거의 엔드 포인트를 원하는 값으로 바꿀 수 있습니다.
즉, 저희는 localhost:3000/api 로 들어 가야 합니다.

짜잔! 이러면 스웨거가 완성됩니다.
간단하죠? 저희가 만든 api들이 있습니다.
하지만 뭔가 이상하죠? cats라니..
자 이제 저희 프로젝트에 맞게 수정해봅시다!
저희는 config 부분만 수정하면 됩니다.
제목과 설명을 수정하고 필요 없는 태그를 지워봅시다. 아래처럼요!
const config = new DocumentBuilder()
    .setTitle('Quiz Galaxy Planet')
    .setDescription('Quiz Galaxy Planet API 입니다. 🚀')
    .setVersion('1.0')
    .build();
이렇게 하면

좋아요 그럴 듯 해지고 있습니다~
여기서 문제가 하나 더 있습니다..
/는 app controller를 지우지 않아서 있는 거라 일단 무시해줍니다.
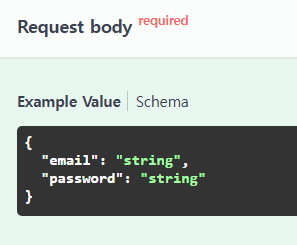
문제는 클릭했을 때

이렇게 나온다는 거죠 여기도 채워 넣어주는 게 좋겠죠?
우선 구성을 보면 크게 3가지입니다.
- Parameters
- Request body
- Responses
이렇게 3가지인데 우선 1번은 지금은 필요 없으니 패스하고 body부분부터 해봅시다.
저희는 DTO가 있죠
DTO파일로 갑니다. 어차피 다 추가 해야 하니 아래처럼 수정 하고
import { ApiProperty } from '@nestjs/swagger';
import { IsEmail, IsNotEmpty, IsString, MinLength } from 'class-validator';

export class SignupDTO {
  @ApiProperty({ description: '닉네임', type: 'string' })
  @IsNotEmpty()
  @IsString()
  nickname: string;

  @ApiProperty({ description: '이메일', type: 'string' })
  @IsNotEmpty()
  @IsEmail()
  email: string;

  @ApiProperty({ description: '비밀번호', type: 'string' })
  @IsNotEmpty()
  @IsString()
  @MinLength(8)
  password: string;
}

export class ConfirmEmailDTO {
  @ApiProperty({ description: '이메일', type: 'string' })
  @IsNotEmpty()
  @IsEmail()
  email: string;

  @ApiProperty({ description: '코드', type: 'string' })
  @IsNotEmpty()
  @IsString()
  code: string;
}

export class LoginDTO {
  @ApiProperty({ description: '이메일', type: 'string' })
  @IsNotEmpty()
  @IsEmail()
  email: string;

  @ApiProperty({ description: '비밀번호', type: 'string' })
  @IsNotEmpty()
  @IsString()
  @MinLength(8)
  password: string;
}
다시 실행시키면
이렇게 잘 나오네요! 좋아요
다시 실행시키기 귀찮죠? 이럴 땐
npm run start:dev
이렇게 실행하면 코드가 수정될 때 마다 다시 실행해 줍니다.
물론 스웨거 페이지는 새로고침을 눌러야 합니다.
자 이번에는 response 부분을 채워봅시다!
저는 일단 decorator 파일을 만들어 아래처럼 추가했습니다.
import { applyDecorators } from '@nestjs/common';
import { ApiOperation, ApiResponse } from '@nestjs/swagger';

export const LoginDecorator = () => {
  return applyDecorators(
    ApiOperation({
      summary: '로그인',
    }),
    ApiResponse({ status: 201, description: 'Created' }),
  );
};
이걸 로그인에 추가하면?!

위 이미지에서 보이듯 ApiOperation({summary: '로그인',}), 이 부분은 설명을 나타내고
ApiResponse({ status: 201, description: 'Created' }), 이 부분은 성공했을 때를 나타냅니다.
하지만 저희는 성공했을 때 데이터를 받으니 그것도 넣어줍시다!
우선 전에 작성한 Entity를 아래처럼 수정해봅시다.
import { ApiProperty } from '@nestjs/swagger';

export class UserInfoEntity {
  @ApiProperty()
  id: number;

  @ApiProperty()
  nickname: string;

  @ApiProperty()
  email: string;

  @ApiProperty({ required: false })
  profile_image?: string;

  @ApiProperty({ required: false })
  introduction?: string;
}

export class UserJWTEntity extends UserInfoEntity {
  @ApiProperty()
  accessToken: string;

  @ApiProperty()
  refreshToken: string;
}
그리고 또 데코레이터에 아래처럼 수정해주면?!
ApiResponse({ status: 200, description: 'OK', type: UserJWTEntity }),
이렇게 완성이 됩니다~~
class 자체가 타입으로도 사용할 수 있다고 하니 문제가 없는 듯합니다.
상태 코드는 찾아보면 성공해서 데이터를 받아오면 200을 주로 사용하는 것 같습니다.
간단하게 실패 했을 때의 상황도 하나 만들어볼까요?
방법은 동일하게 가능합니다.
하지만 이번에는 만들어 둔 entity가 없기 때문에 다른 방법으로 해볼까합니다.
아래처럼 추가해보겠습니다.
ApiResponse({
      status: 400,
      description: 'BadRequest',
      schema: {
        type: 'object',
        properties: {
          message: { example: '이메일 또는 비밀번호가 일치하지 않습니다.' },
        },
      },
    }),
새로고침 해보면

400 에러도 잘 나오네요! 자 근데 실제 메세지는 다르게 나올 겁니다. 한번 확인해볼까요?
우선 어떻게 나오는지 확인하기 위해 예외 처리 코드를 수정해봅시다.
로그인 서비스로 가서 아래처럼 수정해봅시다.
async login(loginDTO: LoginDTO): Promise<UserInfoEntity> {

...

catch (err) {
      throw new HttpException(err, err.$metadata.httpStatusCode);
    }
}
일부로 둘 다 틀려보겠습니다.

이렇게 나오네요!
만약 err.message로 하면

이렇게 나옵니다.
일단 영어죠? 이걸 어떻게 하면 좋을까요?
간단합니다. if문을 사용하면 되죠.
아래처럼 작성해봅시다.
if (err.name === 'NotAuthorizedException') {
        throw new HttpException(
          '이메일 또는 비밀번호가 일치하지 않습니다.',
          err.$metadata.httpStatusCode,
        );
      }
throw new HttpException(err.message, err.$metadata.httpStatusCode);
이렇게 하고 다시 틀려보겠습니다.

WOW! 성공했습니다. 이제 이런 메세지는 contance 상수로 관리해서 사용해볼까요?
간단하게 메세지 상수를 만들어 보겠습니다.
export const AUTH_ERROR_MESSAGE = {
  EMAIL_OR_PASSWORD_NOT_MATCH: '이메일 또는 비밀번호가 일치하지 않습니다.',
};
모두 적용 시키면, 완성입니다!
cognito를 사용하면 이메일 인증을 해야 로그인을 할 수 있습니다.
로그인 실패 시 크게 아래 2개의 이름으로 리턴 됩니다.
- NotAuthorizedException : 아이디, 비번이 틀렸을 때
- UserNotConfirmedException : (이메일)인증이 안되었을 때
그러니 2번도 만들어 봅시다.
상태 코드는 403번이 좋겠네요.
로그인 서비스에 아래처럼 추가하고
if (err.name === 'UserNotConfirmedException') {
        throw new HttpException(
          AUTH_ERROR_MESSAGE.EMAIL_FORBIDDEN,
          HttpStatus.FORBIDDEN,
        );
      }
메세지에는 아래처럼
EMAIL_FORBIDDEN: '이메일 인증을 완료해주세요.',
데코레이터는 아래처럼 추가하면 완성~
ApiResponse({
      status: 403,
      description: 'Forbidden',
      schema: {
        type: 'object',
        properties: {
          message: { example: AUTH_ERROR_MESSAGE.EMAIL_FORBIDDEN },
        },
      },
    }),
저는 코드가 너무 길어지는 것 같아서 아래의 함수를 만들어 봤어요.
export const createResponseMessage = (
  status: number,
  description: string,
  message: string,
) => {
  return ApiResponse({
    status,
    description,
    schema: {
      type: 'object',
      properties: {
        message: { example: message },
      },
    },
  });
};
사용법은 아래처럼 사용하면 됩니다.
export const LoginDecorator = (path: string) => {
  return applyDecorators(
    Post(path),
    ApiOperation({
      summary: '로그인',
    }),
    ApiResponse({ status: 200, description: 'Ok', type: UserJWTEntity }),
    createResponseMessage(
      400,
      'BadRequest',
      AUTH_ERROR_MESSAGE.EMAIL_OR_PASSWORD_NOT_MATCH,
    ),
    createResponseMessage(403, 'Forbidden', AUTH_ERROR_MESSAGE.EMAIL_FORBIDDEN),
  );
};
참고로
@ApiTags() 를 사용하면

이렇게 태그를 나눌 수 있다는 사실!
좋아요 나머지는 똑같습니다.
회원가입과 이메일 인증도 똑같이 만들어 줍시다!
나머지는 여러분에게 맡기겠습니다!
혹시 제가 개발중인 코드가 필요하시면 아래 사이트에서 참고 가능합니다.
SiWooJinSeok/Quiz-Galaxy-Planet-BackEnd (github.com)
GitHub - SiWooJinSeok/Quiz-Galaxy-Planet-BackEnd
Contribute to SiWooJinSeok/Quiz-Galaxy-Planet-BackEnd development by creating an account on GitHub.
github.com
오늘도 모두 수고하셨습니다~ 다음에 또 시간되면 찾아뵙겠습니다~
'퀴즈앱 개발기 > BE' 카테고리의 다른 글
| 퀴즈앱 백엔드 4일차 (cogntio, 코드 재전송, 비밀번호 찾기) (0) | 2024.06.24 |
|---|---|
| 백엔드 퀴즈앱 2일차! cognito 로그인, 회원가입, 이메일 인증 간단 구현! (2) | 2024.06.19 |
| aws cognito 생성하기 (0) | 2024.06.19 |
| 퀴즈 앱 백엔드부터 시작하기(1일 차) (0) | 2024.06.18 |